

****
This is the story of how my simple idea of creating my 2 1/2 year old a magnet board turned into a week long project...because I tend to go WAY overboard every time.
Here is the board:

A few weeks ago I saw these on Zulilly and thought, "the boys will LOVE them!


I quickly searched Pinterest for ideas and saw a TON of huge oil drip pans used as magnet boards SO cool and easy! But, not quite what I was looking for. Then I realized that I could make a more custom board really easily using the magnetic primer that I used last year on the boys' Giant Chalkboard and Train/Lego Table. I knew my next step would be to get something to paint on, so I ran to HD and grabbed a large rectangle of MDF and some more magnetic primer.

Luckily I had some experience with this primer so I knew that the key to success was to shake it up REALLY, REALLY well and then shake it some more. If you don't all the metallic particles will sit at the bottom and you will just be priming your board with black paint that isn't magnetic (yes, I did that last year. GRRR). I also know that the paint is SUPER thick and you kind of feel like you are slopping it on but that is okay.
The paint can says to apply two or three coats to make a magnet stick. My tip is to have a magnet with you to check out how magnetic your board is and then decide if you need another coat. From my experience it will take at least three coats. I did four on this project.
While the paint was drying, I raided my leftover paint cans in the basement. Originally I toyed with the idea of leaving it black like the giant chalkboard, but this was going to live in Max's room so I wanted it to be a little different for him. I found three cans of paint in different shades of blue.
Sherwin Williams Northstar, a bluish gray which happens to be our master bedroom color, Respite, a bright denim color that Ben picked out when we first moved in, (It has since been painted over because it was too blue...it took less than a year for that to happen) and Sailboat by BEHR which was the water color on the train train/Lego table.
My plan was to create a gradient color for the board. By putting the darkest color (Sailboat) at the bottom and the lightest (Northstar) at the top, I was hoping that it would look a little like sea and sky.
I also toyed with painting a chalkboard near the bottom so that Max could work on writing his letters. That idea was quickly nixed when he did this:

Here is the first coat with the blue color. Since the magnet primer is black, I knew I would need more than one coat. I was worried that too many coats would make it less magnetic so I ended up doing three and sanding lightly between each coat to try to knock back the paint a little. I didn't blend the colors until the third coat.


When the paint dried I measured my painted board and decided how much of the board I wanted my moulding to cover (I opted for four inches which left a little overhang) and then cut 45 degree angles for my "picture frame." This is the first time I have done this. I even set up the saw myself which is a huge deal because it COMPLETELY freaks me out. But I did it, and only had to make one correction cut. It was WAY easier than I thought. I just made sure to measure and remeasure, and dry fit as I went to make sure each piece worked where I wanted it to.

I used Liquid Nails adhesive to attach the moulding to the board because I didn't want to deal with nails and filling the holes and repainting.
And here she is again in all her glory! I feel like I should name her. Any ideas?

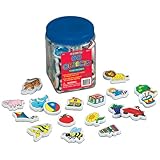
I also ordered this set of foam magnets to add to the board. Max can use these picture magnets to make up stories or spell out the words of the pictures on the magnets. He could also sort the magnets into different categories (the kid is a sorting fool).
Sorry that I don't have a pretty finished picture. I can't put the board up in Max's
room until he gets it for Christmas, so for now it is on the floor in
the basement, although I leaned it up against the door for you guys! I am also going to add some small hooks (probably of the
Command strip variety) to the underside of the moulding to hang small
pails so that Max can store the magnets he isn't using in them. I will update this post after Christmas so you can see it all pretty and hanging in his room!
It looks great. I love magnet boards - I definitely need to make one for my kiddos!
ReplyDeleteI just got a miter saw and it totally intimidates me! I love the frame! Adding this to my ever growing list of things to do:)
ReplyDeletecute idea! I love the idea of a separate magnet board instead of the fridge. I hate the clutter there, too.
ReplyDeleteThanks for linking up to Dare to DIY!
adorable! i love the way you painted it and love the red!
ReplyDeleteThank you! Can't wait to give it to him and get it all set up in his room next to his little red rocking chair! :)
ReplyDeleteThis is super cute! Love the pop of red!
ReplyDeleteThis looks great!
ReplyDelete