So last year, on this date, I wrote this post with four goals for the new year. At the time I didn't even know that I was pregnant. I found out on January 1st. By making his presence known, Rylan, immediately set 2013 off on the right foot and made accomplishing my positivity goal a little easier (after the first trimester, of course... I have learned to be wary during that time.). I don't expect any exciting, over the moon news to happen at the beginning of 2014, but I do have some hopes for smaller changes that will move my family and I in a positive direction.
So, this year my 4 Simple Goals will remain the same. For the most part, they are not necessarily goals that you can say, "There! Finished that one!" And I kind of like that about them. In case you don't feel like reading last year's post, here is a quick recap:
1. Disconnect - More family time when kids are up, less email and Facebook stalking.
I definitely improved in this area as far as staying off the computer between when I got home from work and the boys went to bed. Being home for maternity leave in the fall made it easier. Still, there could be more improvement in this area. The Hubs and I still spend many a night side by side on the couch working on our laptops.
2. Do more projects.
Based on my Dream Big list I have lots of opportunities for this. I am just going to keep plugging away. Although, if I could figure out a way to work from home, it would be a whole lot easier! Maternity leave spoiled me by showing me what was possible.
Some of the projects that we completed this year include, installing the front patio, planting trees, painting the door, starting a garden and compost bin, and, of course, the Christmas project extravaganza (personalized bowl and mugs, magnet board, calendar, joy letters). And, although I didn't mean this type of project when I made these goals, trying to keep writing on this blog has been a project in itself. Although not many people actually read this, it does feel good to write again. And it motivates me to get projects done because I need something to blog about.
3. Be Positive/Find Joy
This is probably my weakest area on the list. But I have found some new inspiration in one of the parents of a former student. She brings joy and happiness to those around her on a regular basis. For example, today she started a pay it forward chain at her local Starbucks just to practice kindness on the last day of the year. Maybe the key here is not just to have a positive outlook on life, but to also create joy in others.
4. Live Healthily
This one is always on the list. I feel good about what I accomplished this year, including running until I was a little over 5 months pregnant, continuing exercising (4 miles a day with two boys in tow) while pregnant, and starting running again after recovering from labor and delivery. The eating side is still a little shaky ( what can I say, I am addicted to sugar) but I am trying and will continue to do so. Maybe I will even sign up for more races this year.
2013 has been a pretty great year! Hopefully 2014 will be another good one. I have a feeling it will be full of changes that I will have to learn to accept with an open heart and embrace fully. A little more sleep would be nice as well. ;)
Happy New Year Everyone! I hope 2014 brings you health, happiness and fun! Let's make it a great one!!

Tuesday, December 31, 2013
Monday, December 30, 2013
Project Overload - First Up... Mud Room Closet Makeover
I am finding myself completely overwhelmed with the amount of projects that are floating around my head. The clutter, both in my brain and in my house, is driving me crazy (as I already mentioned in my last post). At the same time, I have three kids, and the Hubs and I both work full time, and it's ski season, so the time we have to complete the projects is minimal, at best.
I realize that I need to slow it down and accept that it won't happen all at once. So, I made a list (actually, I referred to my dream big list) then picked one project to tackle.
My first project is turning the back hall closet into more of a mud room area. First, I looked for some inspiration (gotta love Pinterest!). And found all of these. Then I sat down with the Hubs to chat about what is the most annoying parts of that area of the house (the clutter) and what we could do to fix it (more storage). Then I whipped up some plans that I thought would accommodate all of our needs. Here are the first draft of my closet plans:


Then I created my "to do" list (which I am sure will change as I go).
To Do:
1. Create bench
2. Create shelves for storage
3. Get baskets and bins to hang on side wall and to put on shelves
4. Get hooks for back wall and side wall for backpacks, jackets, and hats.
5. Figure out a fun color for the wall of finish (wallpaper? decals? wood planking?)
6. Install everything
7. Make cushion for bench
8. Decorate the wall across from the closet with mirror or chalkboard/photos/hooks
Looks like the bench is first. Be prepared, this one is going to take a fewweeks day, and therefore a few posts. You know, because I decided not to rush things.
Oh, and remember those plans at the beginning of the post? Well, guess what? I have already doubted myself and my abilities and revised the plans...maybe more than once. So instead of going totally rogue, I decided to trust someone with much more experience than me. Ana White. I am obsessed with her site and the possibility of it all. Until this weekend I have simply perused her plans and dreamed.
This weekend I looked my fear of failure, and power tools, in the face and decided that her Simple Outdoor Bench would fit in my closet perfectly. Plus, it says it is simple right there in the title.
So I used her list and sent the Hubs to the Depot for the materials and a few other things. He spent less than $50 on the materials including things like screws, which we had none of. He also grabbed a few tools that we needed since I am a beginner at this. I did not even have a square. I admit it fully, and am now the proud owner of a shiny new one.
Before cutting anything, I measured all of the boards at least three times before, and after, each cut. I was very afraid to mess something up. I checked and double check the cut list because I tend to mix up numbers, especially when I am rushing. I took lots of deep breaths, made sure I was safe with the miter saw and that my fingers were no where near the danger zone, and made ALL the cuts by myself! Yes, I am proud. Jumping up and down, I rocked it, proud. Is that a little sad? Want proof?


Then I enlisted the Hubs and the oldest son to help me prime and sand boards. Lots of boards.

I realize that I need to slow it down and accept that it won't happen all at once. So, I made a list (actually, I referred to my dream big list) then picked one project to tackle.
My first project is turning the back hall closet into more of a mud room area. First, I looked for some inspiration (gotta love Pinterest!). And found all of these. Then I sat down with the Hubs to chat about what is the most annoying parts of that area of the house (the clutter) and what we could do to fix it (more storage). Then I whipped up some plans that I thought would accommodate all of our needs. Here are the first draft of my closet plans:

And here is the craziness that was my mud room closet and the teeny tiny hall in front of it.


(Not sure why I have the sunscreen out in the middle of the winter.)

To Do:
1. Create bench
2. Create shelves for storage
3. Get baskets and bins to hang on side wall and to put on shelves
4. Get hooks for back wall and side wall for backpacks, jackets, and hats.
5. Figure out a fun color for the wall of finish (wallpaper? decals? wood planking?)
6. Install everything
7. Make cushion for bench
8. Decorate the wall across from the closet with mirror or chalkboard/photos/hooks
Looks like the bench is first. Be prepared, this one is going to take a few
Oh, and remember those plans at the beginning of the post? Well, guess what? I have already doubted myself and my abilities and revised the plans...maybe more than once. So instead of going totally rogue, I decided to trust someone with much more experience than me. Ana White. I am obsessed with her site and the possibility of it all. Until this weekend I have simply perused her plans and dreamed.
This weekend I looked my fear of failure, and power tools, in the face and decided that her Simple Outdoor Bench would fit in my closet perfectly. Plus, it says it is simple right there in the title.
So I used her list and sent the Hubs to the Depot for the materials and a few other things. He spent less than $50 on the materials including things like screws, which we had none of. He also grabbed a few tools that we needed since I am a beginner at this. I did not even have a square. I admit it fully, and am now the proud owner of a shiny new one.
Before cutting anything, I measured all of the boards at least three times before, and after, each cut. I was very afraid to mess something up. I checked and double check the cut list because I tend to mix up numbers, especially when I am rushing. I took lots of deep breaths, made sure I was safe with the miter saw and that my fingers were no where near the danger zone, and made ALL the cuts by myself! Yes, I am proud. Jumping up and down, I rocked it, proud. Is that a little sad? Want proof?


Then I enlisted the Hubs and the oldest son to help me prime and sand boards. Lots of boards.

And this is where I am taking a break for today. It really hasn't been too bad yet. Maybe a few hours total. Did anyone else tackle a building project for the first time this weekend? More tomorrow. Thanks for your patience on this one!
Thursday, December 26, 2013
Big Plans. Big, Big, Plans
What is it about the day after Christmas that brings about a desire no, a need, to organize? Is it the impending new year with all its resolutions? Is it because by the time Christmas is over you have spent so much time in your house that you are confident that you can make it all better with just a few baskets and bins? Or, is it because of the sheer amount of crap that your kids received that is now strewn across your living room? Ding, ding, ding!
No matter what I do. the kids' stuff somehow comes out on top. I literally picked up my house four times yesterday. Four times! And still, when the boys went to bed it was like I never touched it. I stayed up until 11:00 last night, picking up AGAIN. And by seven this morning there it was, laughing at me. I have picked up at least twice today and I am currently sitting here, blogging, looking at their toys. Still!
It's not like the kids haven't picked up their toys every time I tell them to. They have. We just have too much stuff and nowhere to put it.
The frustration, and a touch of anxiety because of the clutter (is that normal?) have set into motion some big plans for the future storage and organization of stuff, as well as the sheer amount of stuff that will be kept in this house. That's right! It's purge and organization time baby!
I have already spent four hours in the basement tossing, boxing up for donation, consolidating, and shelving everything I could get my hands on. That was probably when the final living room destruction happened. The Hubs isn't feeling great and apparently wasn't up to battling the clutter. I am not ready to show the progress down there because Christmas decorations are still out so I have to keep all of their storage boxes easily accessible.
The mud room closet is also the bane of my existence right now.The close cousin of the living room clutter monster. The older, beer bellied, stinky cheese close cousin. I spent a few hours on that problem too, but was sidelined when the snow started falling quickly (who knew it was supposed to snow?). Wait until you see the before pics you will completely understand where I am coming from. But until I get my act together here is a sneak peak at the plans.
Anyway, those are my number one and number two (out of 60 or 70) priority plans for dealing with all of our crap. Do you have any organization plans? Or any ideas you'd like to share? I need all the help I can get.
Tuesday, December 24, 2013
The View from Here - Christmas Eve Edition
This Christmas Eve day is filled with the beauty of a sunny day post ice storm. The ice coated trees are glistening like glass. The weight pulls some of the more flexible trees down to make arches that could lead to imaginary lands. It is, simply, magical.


Merry Christmas from our family to yours!


Merry Christmas from our family to yours!
Monday, December 23, 2013
Advent adventures: Go to a Parade
The Sparkle Parade is one of our family traditions. Every December, no matter what the weather, we trudge to Main Street to watch a (thankfully) short and sweet parade full of twinkle lights.
The school's band wear antlers with sleigh bells, lighted hats and bracelets and march down the street playing festive holiday tunes. They are followed by boy scouts with candy canes and more lights.
The local unicycling group (yes we have one and they are pretty darn good) made up of elementary and middle school students light up their wheels and don Santa hats as they make their way down the street stopping every hundred feet or so to "perform."
There is a glowing Mickey Mouse and Pooh Bear too. The local McDonald's employees dress up as french fries. And, other local groups set up bands in beds of pick ups or
The boys' eyes glow when they see the lit up bulldozers, fire truck, giant LL Bean boot, and, last but not least, Santa traveling aboard a fishing boat. The smiles on the kids' faces make the cold and dark worth it every year. We have been there in snow, sleet, rain, warm(ish) temperatures, and freezing cold. It doesn't matter because it is a fun and festive parade that warms my heart.
Thursday, December 19, 2013
Advent Adventure: Let's Decorate Some Cookies
This weekend, after a sleepover with Nana and Papa, and a sleepover with Grandma, the boys pulled the decorate cookies card from the advent calendar. The Rocky Theme song immediately began playing in my head. Is that strange? We are serious about our cookies around here!
Anyway, I am not going to pretend that I did anything from scratch. I have, it's much more time consuming and I don't have time, so I bought the Pillsbury sugar cookie dough. Then we rolled it out with the flour and the kids cut out the shapes they wanted. Simple and easy.
After baking the cookies and letting them cool, I brought out the sprinkles and candies and store bought cookie icing.
Yup, I didn't even make that. In years past, I have not only made it all from scratch but I also made more than one kind of cookie, as well as the Rolo pretzels, and peppermint bark, and chocolate covered pretzel rods and Oreos...but, you know what? It's not happening this year because I am trying to make things simpler and easier.
The boys love cookie decorating, probably because just as much candy ends up in their stomach as on the cookies.

I have learned that giving them free access to cookie decorations will inevitably and up with piles and piles of sugar crystals and sprinkles dumped on the middle of the cookie. So I divvied up smaller portions in these fun hot dog containers from their birthday party.

While the craziness of the cookie decorating ensued, the baby calmly and happily took it all in.

Now that we are done, Ben is trying to decide which cookies we should leave for Santa. The boys do not care that we only decorated sugar cookies, or that all of it was store bought. Less stress makes my life easier, and all of us happier.
Wednesday, December 18, 2013
Quick and Easy "Joy" Decoration
Here is my quick and easy home decor for the holidays. Seriously quick (less than 15 minutes) and seriously easy ( if I can do it anyone can).
The supplies:


The supplies:


Yes, the glass of wine is imperative when I am trying to throw something together at 10:00 at night...
If you notice, the glass balls I bought have different finishes. The matte balls were the easiest to work with. They clung to the glue much better. I would also recommend using the stronger hold glue sticks ( I used the lightest hold and I really had to slather it on).

I laid out the balls to form the letters making sure the hooks for the string were in the back except for the top, which I turned up so I could add ribbon to hang the letters. Then I just applied the glue where the balls met.
When it was dry, I strung the ribbon through the loops at the top of the balls and hung them up. Make sure to string them through more than one bulb to help distribute the weight.


Easy peasy!
Tuesday, December 17, 2013
Grandma Wins the Best Gift (so far) Award: Peanuts Club House
Have you seen these?


Grandma showed up apologizing profusely for this gift. I have to admit, I considered getting it for the boys myself because they LOVE forts. But, the size of it made me decide against it.
Now that it is set up in my living room, it is huge, but the boys are loving it. And, the best part (are you listening Moms?) they have been coloring it for - no joke - four hours. They keep going back to it! Keep in mind, if I give them normal coloring pages, or paper, they last maybe ten minutes... If I am lucky.
This house is made out of cardboard, so it is recyclable ( for when I have had enough and want to get it out of my living room) and, according to Grandma relatively inexpensive. As an alternative, I suppose if you have old cardboard boxes in your basement you could let the kids create their own cardboard buildings and cities for free!
Anyway, if you are looking for a snow day activity that will keep everyone engaged for a significant amount of time, I highly recommend these houses!

Update: The boys have now dragged blankets and pillows into the house and are playing quietly. The Hubs and I have even had a chance to have an actual conversation without one interruption! It's almost like we have an extra room in the first floor. Thank you, Grandma!!
Monday, December 16, 2013
Advent Adventures - Buddy's Scavenger Hunt
Buddy is our elf. You know, of the Elf on the Shelf variety. As an aside, I am torn on our little Buddy. On one hand, whoever came up with the idea is a freaking genius. I mean Buddy works for behavior manipulation like a dream, BUT it is a little creepy if you think about it. Who wants to be "watched" every moment of every day?
Anyway, Buddy left a scavenger hunt for one of our advent adventures. I picked up these pails and chocolate gold coins at Target for $1 each. Then I wrapped the pails with a note from Buddy telling the boys about the hidden treasure.

The boys had to find all of the "treasure" that Buddy had hidden for them.

The boys LOVED it and it was a pretty cheap activity coming in at $4 in all. If you want to know more about our advent adventures, check out the post here.
Thursday, December 12, 2013
Three Kids and a Full-Time Job - Who Has Time to Run?
Great question! As I already mentioned, my maternity leave is over...
And yet I have also told you how much more pleasant I am to be around when I get a run in...even if it is incredibly quick. So, what is a girl to do?
First of all, can I just say that it infuriates me when experts go on shows like the Today Show or Good Morning America, or contribute to articles in Fitness or Shape and preach about how you CAN find time in your day to excercise. Every single moment of my day is scheduled. I have NO time. Especially if I want to run when there is enough daylight so that I won't be mistaken for a prancing deer just begging to get shot by a hunter or a wannabe thief looking to speak with local law enforcement.
My day starts with breastfeeding the baby. Can I go run before this? Nope. It doesn't really matter if I could ignore the bowling balls on my chest first thing in the morning because I would not feel safe running in the pitch black pre-6am light. After feeding the baby I then race to get dressed and ready for work, make lunch for myself and my school age son, feed the older two boys their breakfast, and sneak in quick kisses to all my boys (the hubs included) before bolting out the door. I do all this in the span of 45 minutes and also fit in one quick pumping session to make sure my breasts are completely empty before I start the day.
I work a full day and before you tell me to run at my lunch break, I only have a 21 minute lunch during which I hide in a closet and pump again. Break time? Teachers don't really get that. We have prep times full of meetings (team, grade level, content area, evaluation groups, special ed., counseling, parents who want face to face conferences, the list goes on and on). When I do get a "free" period I hide in the closet to pump and maybe grade some papers or prepare lesson plans.
When I leave work I rush to daycare to pick up the baby and the toddler so that I can get back to the bus stop to meet the bus. Now I have three children in my wake and, as I have mentioned before, no way to take them all with me on a run and I still have to fit in at least two feedings with the baby before dinner. My only option is to find a treadmill with access to a television to occupy the kiddos. Quality bonding time?
If I wait until my husband gets home it is once again dark and I am usually in the process of preparing or feeding the kids dinner. Then it is a whirlwind of pjs and teeth brushing, stories and snuggles. One more feeding with the baby and lesson planning, paper grading, and responding to emails that I can't read or answer at school because I am "on stage" all day long. Sadly, my husband and I are usually sitting at opposite ends of our couch on our laptops doing work. Romantic night, huh?
As you can imagine, I am EXHAUSTED at the end of the night, but still find time to beat myself up over not fitting in a run.
The weekends are my only salvation. If I am lucky I can run on Saturday and Sunday mornings. If I get those two runs in I feel like I am winning. Anything else is a pure miracle.
How do you fit your runs in? If I could finagle a treadmill for my house I may be more successful, but it would honestly be a struggle to get one in even with it. A double running stroller might also help, but again it would be quite a monumental effort with all three boys in the winter. Sometimes I feel like I can't win, but I keep trying.
"Just keep swimming"
Wednesday, December 11, 2013
Advent Adventures: Make a Gift for Someone Else
I want my kids to understand that Christmas is not all about getting presents and Santa. It is also about giving, and family, and love, and hope, and all those other wonderful things. So, today's adventure is to make a gift for someone else. Knowing how much my kids like dough, I decided to go with salt dough ornaments. I have fond memories of doing this craft as a kid and thought the kids would really enjoy it.
The recipe:

I mixed and kneaded the dough, then rolled it out and let the kids go to town.


Then we baked them for 2 hours at 250 degrees


Some of them did puff up just a little bit. I simply deflated the air bubbles when they first came out and they stayed down. There is also some cracking on some of the ornaments, but it adds to the charm of the handmade gifts I think.
When they were done, and cooled, we started painting. I had the kids use poster paints because I knew they would clean easily but be a little thicker than water colors.
When they were done, and cooled, we started painting. I had the kids use poster paints because I knew they would clean easily but be a little thicker than water colors.


When the paint was dry I sprayed both sides of the ornaments with clear spray paint to seal them. Then we strung ribbon through the holes so they could be hung on Christmas trees.
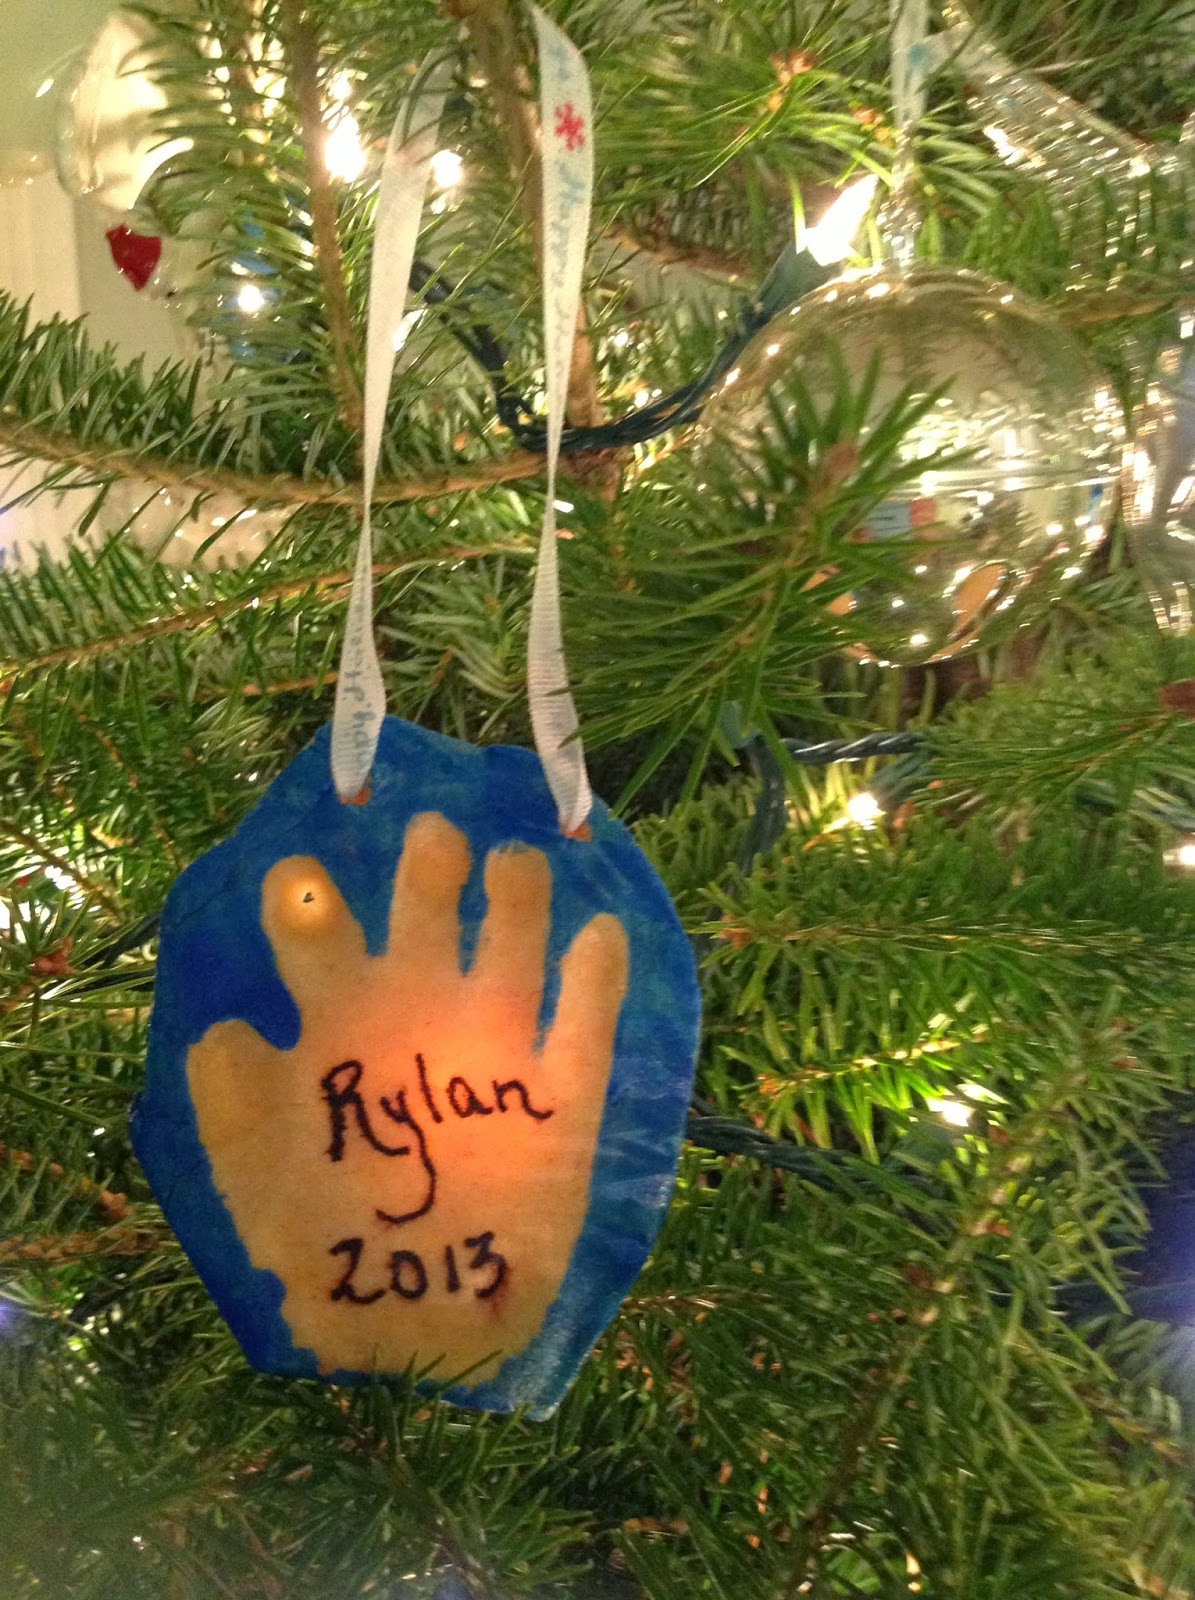


Now we just have to wrap them up for Nana and Papa, Grandpa and Nana Jojo, Grandma, the dog and her friends, and everyone else who will be lucky enough to have these handmade gifts grace their tree.
To read more about advent adventures, go here.
Monday, December 9, 2013
Homemade Magnet Board

****
This is the story of how my simple idea of creating my 2 1/2 year old a magnet board turned into a week long project...because I tend to go WAY overboard every time.
Here is the board:

A few weeks ago I saw these on Zulilly and thought, "the boys will LOVE them!


I quickly searched Pinterest for ideas and saw a TON of huge oil drip pans used as magnet boards SO cool and easy! But, not quite what I was looking for. Then I realized that I could make a more custom board really easily using the magnetic primer that I used last year on the boys' Giant Chalkboard and Train/Lego Table. I knew my next step would be to get something to paint on, so I ran to HD and grabbed a large rectangle of MDF and some more magnetic primer.

Luckily I had some experience with this primer so I knew that the key to success was to shake it up REALLY, REALLY well and then shake it some more. If you don't all the metallic particles will sit at the bottom and you will just be priming your board with black paint that isn't magnetic (yes, I did that last year. GRRR). I also know that the paint is SUPER thick and you kind of feel like you are slopping it on but that is okay.
The paint can says to apply two or three coats to make a magnet stick. My tip is to have a magnet with you to check out how magnetic your board is and then decide if you need another coat. From my experience it will take at least three coats. I did four on this project.
While the paint was drying, I raided my leftover paint cans in the basement. Originally I toyed with the idea of leaving it black like the giant chalkboard, but this was going to live in Max's room so I wanted it to be a little different for him. I found three cans of paint in different shades of blue.
Sherwin Williams Northstar, a bluish gray which happens to be our master bedroom color, Respite, a bright denim color that Ben picked out when we first moved in, (It has since been painted over because it was too blue...it took less than a year for that to happen) and Sailboat by BEHR which was the water color on the train train/Lego table.
My plan was to create a gradient color for the board. By putting the darkest color (Sailboat) at the bottom and the lightest (Northstar) at the top, I was hoping that it would look a little like sea and sky.
I also toyed with painting a chalkboard near the bottom so that Max could work on writing his letters. That idea was quickly nixed when he did this:

Here is the first coat with the blue color. Since the magnet primer is black, I knew I would need more than one coat. I was worried that too many coats would make it less magnetic so I ended up doing three and sanding lightly between each coat to try to knock back the paint a little. I didn't blend the colors until the third coat.


When the paint dried I measured my painted board and decided how much of the board I wanted my moulding to cover (I opted for four inches which left a little overhang) and then cut 45 degree angles for my "picture frame." This is the first time I have done this. I even set up the saw myself which is a huge deal because it COMPLETELY freaks me out. But I did it, and only had to make one correction cut. It was WAY easier than I thought. I just made sure to measure and remeasure, and dry fit as I went to make sure each piece worked where I wanted it to.

I used Liquid Nails adhesive to attach the moulding to the board because I didn't want to deal with nails and filling the holes and repainting.
And here she is again in all her glory! I feel like I should name her. Any ideas?

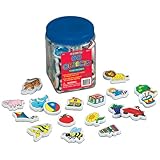
I also ordered this set of foam magnets to add to the board. Max can use these picture magnets to make up stories or spell out the words of the pictures on the magnets. He could also sort the magnets into different categories (the kid is a sorting fool).
Sorry that I don't have a pretty finished picture. I can't put the board up in Max's
room until he gets it for Christmas, so for now it is on the floor in
the basement, although I leaned it up against the door for you guys! I am also going to add some small hooks (probably of the
Command strip variety) to the underside of the moulding to hang small
pails so that Max can store the magnets he isn't using in them. I will update this post after Christmas so you can see it all pretty and hanging in his room!
Sunday, December 8, 2013
A Letter to my Colleagues Upon the End of Maternity Leave or, the Worst Day Evah'
Dear Colleagues,
I write this letter to you upon the eve of my return to work. I know that my absence may have made many of your lives more difficult. You may have missed my whitty banter, or my ability to tell it like it is. Perhaps you have dreaded the day that I returned since the day I left. However you are feeling, you may decide that the nice thing to do would be to welcome me back. I mean this in the nicest way...please don't.
You see any kind words, or general questions about my baby, who I just left with someone who is not me, will undoubtedly bring on the water works. I know that you may not understand my fragile emotional state on this day, so here I will try to explain why I am a freaking mess.
Maternity leave is the only time where it is expected that a mom's entire focus should be devoted to rest, heal, and bond with her newborn. She has, perhaps for the first time in her life, been allowed, even encouraged, to "put [her] feet up," "get as much sleep as possible," and "let [her] husband (or others) do all of the housework, cooking, and care taking of any other children" so that she can cuddle, kiss, snuggle, and bond with her baby.
During this time, the bond between a mother and her newborn is so connected that the baby may only be able to be calmed by the mother. As the baby grows he/she saves special smiles just for Mom, laughs for the first time with Mom, and spends hours cuddling with Mom. As you can imagine allowing something else to get in the way of all these special smiles, coos, and cuddles is not ideal. A mother returning to work is dealing with the absence of these moments. She is also dealing with the fact that someone else is experiencing these moments with HER child. A child who is just beginning to reveal a little of his or her personality and becoming an adorable social being.
Additionally, she is exhausted because (if she is lucky) her child sleeps for six hours at night. Her breasts are painfully engorged because she is no longer allowed to choose when to feed her baby, but instead must plan her pumping sessions according to her work schedule. Oh, and those pumping sessions? Those are done hidden away in a closet where she will spend the twenty minutes or so crying because she is stuck in a closet attached to a machine instead of snuggling with her beautiful baby. The day will be never-ending and your "thoughtful" inquiries will only help to remind her that she is not where she would like to be.
So, on this end of my maternity leave, this worst day ever, please, please, please, don't ask. And, if you do, be prepared for tears. Also, don't try to chat with me at the end of the day because I plan to be out the door as soon as humanly possible and if you make it take a moment longer I will snap your head off.
If you would like to help support me, allow me a few extra moments to get myself together, don't point out the red rimmed eyes, disheveled hair, or dark circles, and if I am late for everything, pretend that I am not. No, I am not excited to be back at work. No, I did not miss it. No, I do not care about anything that is happening around me. Right now, I just want to be home with my child.
And finally, don't expect this to change for a few days. The second day is not as terrible as the first, but it is still pretty bad.
Thank you for listening,
A new mom
Friday, December 6, 2013
Advent Adventures - Decorate a tree
This one could have gone SO many ways.

Originally I was planning on bringing the boys to Target and letting them pick from the collection of 2' tinsel trees. They come in pink, blue, silver, and gold. They were also going to pick from the lights, mini ornaments, tree skirts, and toppers available for these mini trees. When they had decided what they wanted we were going to go home, decorate the trees, add our own original ornaments, and then put the trees in their rooms as decorations.
Obviously this little rendezvous could have gotten a little expensive and having a mini tree in my two year olds' room may have spelled disaster for his curious little hands. So I put that idea in my back pocket for when the boys get a little older.
I then decided that the kids could pick one of the evergreen trees in our yard and decorate the tree for the birds and animals. I envisioned popcorn and cranberries and bird seed ornaments (you know pine cones with peanut butter, birdseed mixed up into blocks and cut into shapes with cookie cutters, that type of thing).
This idea was nixed because stringing popcorn and cranberries requires a needle and patience which means that I will undoubtedly be doing most of the work. Also, I was afraid that there would be other animals, like deer, that would find their way into our yard and I didn't want to encourage these lovable creatures to eat our new trees.
My third idea was the winner for this year. Christmas trees made out of sugar cones, decorated similar to gingerbread houses. Genius, right? The kids could choose the candy they wanted to use and make their tree completely their own.

Of course, they chose the most expensive candy..oh well.
First, I put a ring of frosting on a plate to hold the cone in place.

Then I put the frosting around the cone as I rotated the plate.


 Of course, Ben wasn't sure how to actually eat his tree, so he decided the no hands method was the best option.

Originally I was planning on bringing the boys to Target and letting them pick from the collection of 2' tinsel trees. They come in pink, blue, silver, and gold. They were also going to pick from the lights, mini ornaments, tree skirts, and toppers available for these mini trees. When they had decided what they wanted we were going to go home, decorate the trees, add our own original ornaments, and then put the trees in their rooms as decorations.
Obviously this little rendezvous could have gotten a little expensive and having a mini tree in my two year olds' room may have spelled disaster for his curious little hands. So I put that idea in my back pocket for when the boys get a little older.
I then decided that the kids could pick one of the evergreen trees in our yard and decorate the tree for the birds and animals. I envisioned popcorn and cranberries and bird seed ornaments (you know pine cones with peanut butter, birdseed mixed up into blocks and cut into shapes with cookie cutters, that type of thing).
This idea was nixed because stringing popcorn and cranberries requires a needle and patience which means that I will undoubtedly be doing most of the work. Also, I was afraid that there would be other animals, like deer, that would find their way into our yard and I didn't want to encourage these lovable creatures to eat our new trees.
My third idea was the winner for this year. Christmas trees made out of sugar cones, decorated similar to gingerbread houses. Genius, right? The kids could choose the candy they wanted to use and make their tree completely their own.

 |
| My 6 year old took these pictures. Please keep that in mind... |


And here is what it looked like when I was done. Looks like a tree, right? Easy!
Next it was up to the kids to add their touch. Of course, they had to taste test the product before adding it to their trees.


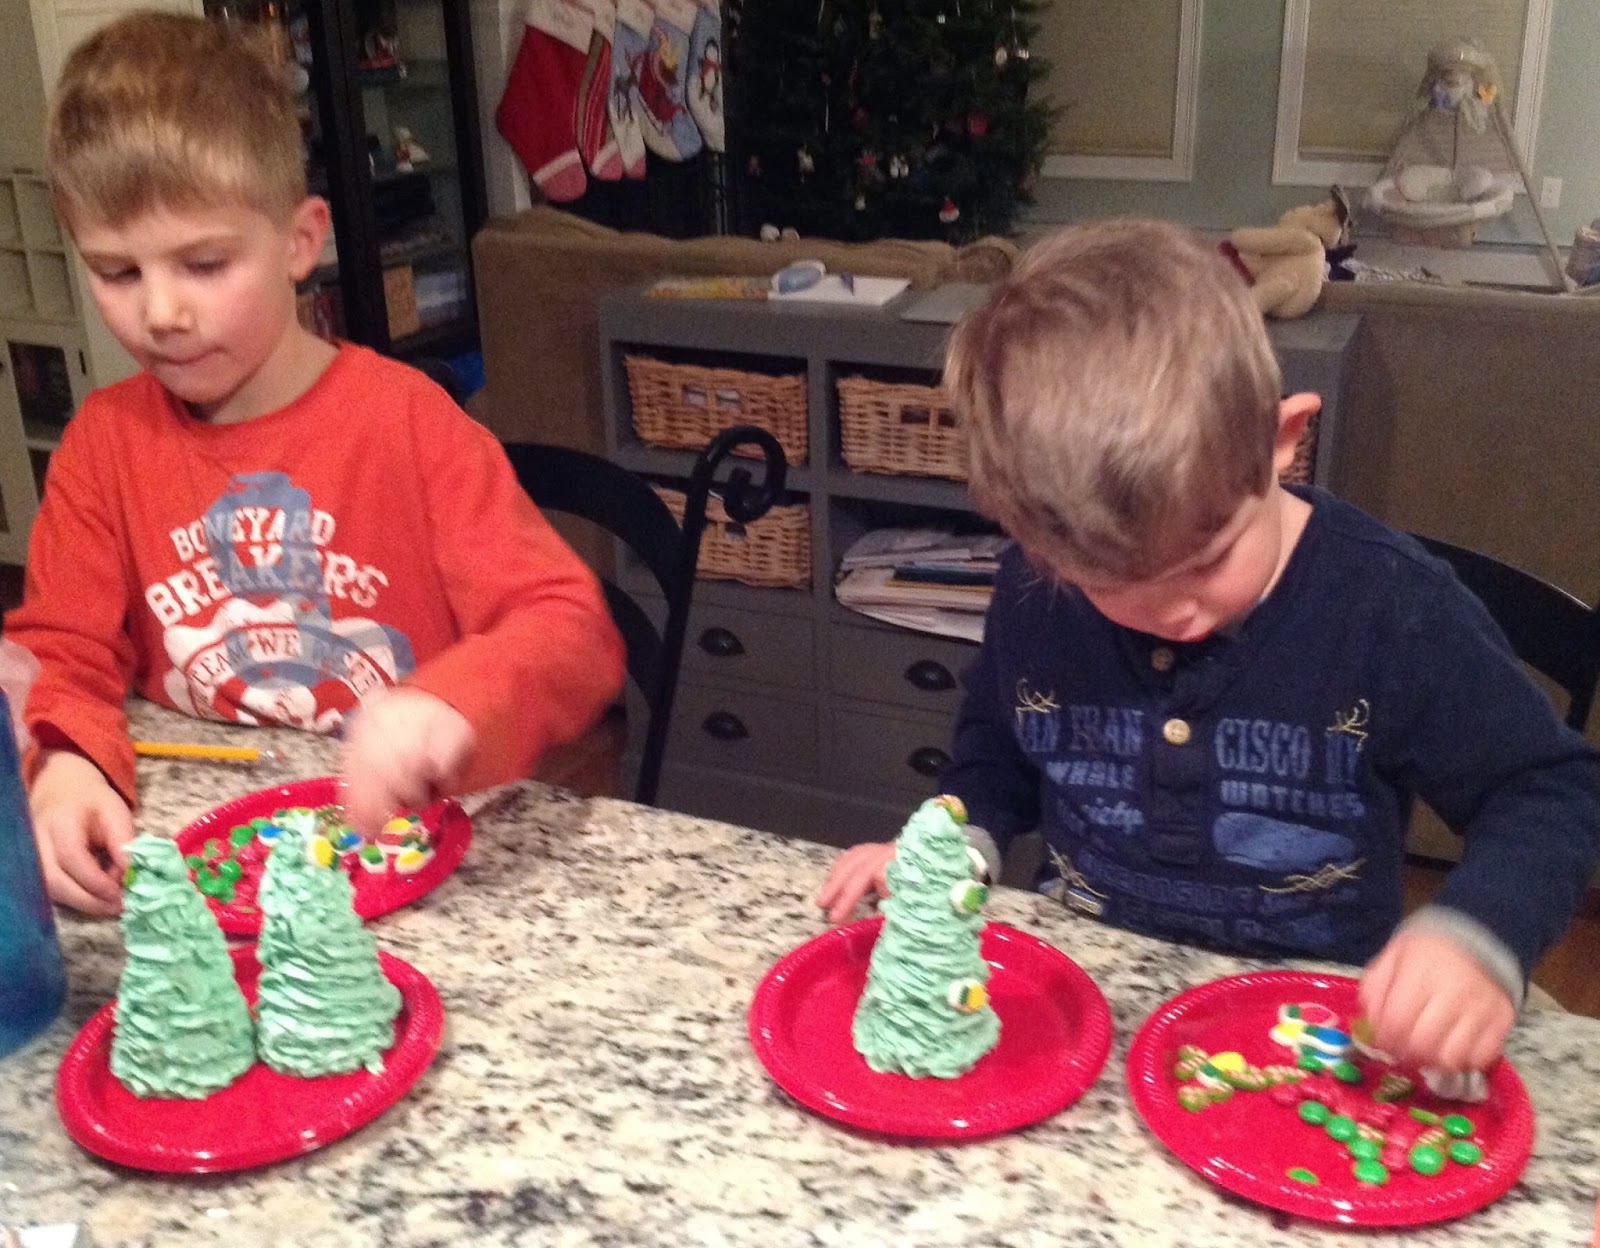

Here they are all finished. Unfortunately, I didn't prepare for the fact that my two year old would have a COMPLETE meltdown when I told him he would have to wait until after dinner to eat his tree. (Yes, I let them eat one tree...don't judge.)


Next year, I will do this one with gingerbread houses (made out of graham crackers to make it easier) so that the decorating will last a little longer.
I would also LOVE to try one of the other decorate a tree ideas. Maybe one year will make the difference in what the boys can handle on this one. Have you had any food decorating adventures in your house yet this year?
Subscribe to:
Posts (Atom)