Wednesday, October 30, 2013

Easy Prettified Wooden Letters

Yes, I know that "prettified" is not a word, but I was looking for an adjective that was somewhat interesting and all that I could think of was prettified, so I went with it. Now, let's move on...

One of the items on my Dream Big list is to personalize Rylan's nursery. It was Max's room first, and we have been handing down bedding, furniture, and decorations through all the babies.

While I was pregnant I looked all over for inspiration on how to decorate the nursery for baby #3. I saw a TON of names on walls. Now, this isn't a new trend. In fact, it is possible that it is on its way out, but it is something that I have liked, but never done. So I decided that one element of the nrsery had to be these letters. Now, they aren't really that expensive, but I didn't really have the budget to spend $40 plus on this one piece of decoration (three kids, remember?). So, I bought these white wooden letters at JoAnn Fabrics. They were very cheap inexpensive.

I wasn't quite sure what I wanted to do to decorate them, so I bought a few things in the colors that I was thinking would work, and hoped that inspiration would strike when I got home. One thing you need to know about me is that I am all about instant gratification. The more steps and time that it takes for me to finish a project, the more likely that it will turn out badly because I rush at the end.
So, I was looking for something quick and easy in hopes that I wouldn't ruin these simple lovely letters.

Once I laid everything out I decided that I really didn't feel like painting and waiting for the paint to dry (I know, I am pathetic), so I now have some lovely craft paints for my next project. I also knew that if I didn't get this project done NOW, I probably wouldn't be motivated again for the next few months, if ever.

My eyes drifted to the Washi tape. I have seen so many posts about how wonderful the tape is, and seen so many lovely projects, that I was having trouble believing the hype. But, I had picked up some rolls of tape from Target just to play around with it. It is pretty and I figured that if worst came to worst I would have some beautifully wrapped gifts.

This was my favorite of the ones that Target had in stock. Their supply was pretty low even though I had seen tons of choices just weeks earlier. Apparently lots of people have jumped on the Washi train.


I really like the pattern on it. It is subtle, but I thought it would pop nicely against the white. So, I decided to try it out. Here is what I came up with.

I know the lines aren't straight, but I already told you, a perfectionist I am not. I suppose I could have used a straight edge to mark my lines. I could have also cut the tape with an Exacto knife to get around the curves more cleanly and make perfect edges, but instead I ripped the tape. (Yup, that's how I roll.)

I tried to keep in mind that the letters would be up on the wall, so I paid attention to the edges and underneaths since it is a pretty good chance that they will be seen. The back of the letters are not as pretty, but who cares? No one will see them anyway.

Initially I thought that I would do each letter with a different tape, or combination of tapes. However, I tend to be one of those people who overdoes things. So I restrained myself and stuck with this one roll of tape. I did allow myself to vary the stripes just because I didn't want it to be too boring, and I knew that they would never come out matching.

Here is what I had when I was done.
I really think Rylan likes them, don't you? I don't have a finished in the room picture because this is the first thing that I have done for his room, but it is a start, right? I promise to post one when I get there.

This was even easier than I could have imagined. I am completely obsessed with this tape now. And, I have three and a half rolls of it left! What should I tape next?


Tuesday, October 29, 2013

Running after baby - Week 1

First, I need to do a little celebratory dance, I made it through week one! Yay!!
If you are just starting out, please read my before baby running prep post here . And, please remember that your body used to look like this:

.... or something similar to this. So be kind to it, it needs some time to get back to where it was. Don't forget to listen to it!

Starting out I knew that I wouldn't be able to run as far, or as fast as I did before. What I didn't expect was that  I would not be in control of my own body. My legs refused to listen to what my brain was trying to tell it to do.  I guess this is expected, I mean my muscles have probably all disappeared during the last few months of recuperation.  Consider yourself warned. It will not be pretty, or easy, but at this point I figure doing anything is a step in the right direction.

Here is how I tackled week 1:
1. I planned to get my butt out the door every other day. This left my body one day to recover.
2. I planned to go at least 30 minutes (anything over was a bonus).
3. I let myself off the hook with running the entire time. I gave myself permission to walk some and run some.
4. Every day I tried to run/walk a little further or sustain my running for a little longer. I used driveways, or trees as markers and pushed myself to get to one further the next day.
5. I quickly realized that I needed to make sure to stretch after every "run." I tend to be lazy with stretching, but I could barely walk down my stairs after day one.
6. I promised myself to listen to my body. If the day after running, my body gave me any indication that I was doing too much, I decided that I would give myself an extra day to recover, and if that didn't work I would do a little less.
7. I made sure to feed the baby right before I headed out the door. That way my boobs would be empty of milk.

The results:
I ran three days and made it up to 2 miles sustained running by the third day. This was a huge accomplishment considering that it took me over a month to get to this point with my last son. I think this is a result of exercising so much while I was pregnant.

By my second running day I was considerably less sore. I no longer felt that my legs would collapse underneath me causing me to fall down the stairs (bonus!).

After day three my body gave me a clear message that I needed to dial it back a little. Even though I waited six weeks, got the okay from my doctor, and had stopped bleeding for over two weeks, it started again. So, I am taking an extra day off to see if that is enough.

If you are starting running good luck! If you are planning to, you can do it! Believe me, if I can, you can!

Sunday, October 27, 2013

Fall Outings - Pumpkin Festival

This past weekend we took the boys to the pumpkin festival at LL Bean. This is an annual fundraiser for Camp Sunshine which is a camp in Casco, Maine for kids with life threatening illnesses and their families.

Ben's class carves pumpkins for this festival every year. It is amazing to see all of the pumpkins created by students in area schools, and employees from neighboring businesses displayed on the LL Bean campus. They line the streets of downtown Freeport,
are stacked into pumpkin towers,

create a pumpkin maze, and line the walkways and streets of the campus.
] 

During the festival you can purchase a pumpkin to carve and add to the collection. In fact, people were still carving even when volunteers had begun lighting the pumpkins. 

There are events for kids and adults, live bands, snacks, and of course the pumpkin lighting. Unfortunately we had to get home to feed the baby before the lighting, but it was a fun way to spend the afternoon. 

http://www.campsunshine.org/pumpkinfestival/portland_home.html
http://www.campsunshine.org/pumpkinfestival/images/portland_top.jpg


Next year, hopefully we can all carve pumpkins for this great cause! 

Friday, October 25, 2013

Running after Baby - Let's Get it Started

Did you read the last part of the title like the Black Eyed Peas song? No? Now I can't get it out of my head!

So, first of all I need to be clear about one thing, I am by no means an expert in any of this. I have had no training, nor done any research past my own curiosity, so please check in with your doctor before starting anything. This is simply a reflection on my experiences with running post-pregnancy. Take it or leave it.

A little background:
I desperately wanted to run during all of my pregnancies. I had read a bunch of research that said exercising throughout pregnancy is good for you and the baby. I also learned that it would be easier to shed the pounds and get back in shape after the baby. Sounded good to me.

Unfortunately, with my first son I was incredibly cautious, as many first time mothers are. I didn't want to do anything wrong. So, instead of continuing my running routine I began walking and using lower impact machines at the gym. I was by no means regular with my exercising, sporadic would be a good description of it.

With my second son, I lived in constant fear. I experienced two miscarriages between my two kids and was so afraid that it would happen again that I stopped doing everything...running, drinking coffee, everything. I just didn't want to rock the boat. It was crazy.

With my third son I vowed to be more laid back. I adopted a fate based stance. If we were meant to have this baby we would. And so I ran. I ran until I was five months pregnant and then I continued walking three to four miles with my boys (they rode bikes). I definitely felt better and so much more relaxed during this pregnancy. Another added bonus was that the boys were getting extra exercise everyday and we had time to chat while we walked.

I can honestly say that I think all this pregnancy exercise has helped me bounce back faster which was extra important this time since I have two other boys to chase around. You may also be asking yourself what the heck running and exercise has to do with our home. Well, when I don't exercise I am less than chipper. I snap more quickly, yell more, it is not pretty. When I run we have a calmer happier home.

If you are planning to start running after having a baby here are some pieces of advice for before the actual first day of running.

1. You have to walk before you run. Not necessarily walk, but you should start slowly and see how your body responds. With my first son I did too much too soon and my body rewarded me with blood. (Yes, I know, ewww!) If your bleeding picks up it is a sign that you have done too much. Small steps.

2. Listen to your body. Bleeding is not the only way your body may tell you that you are doing too much. With my second son, I tried to do some light weights and calisthenics before my six week check-up. I felt great right after exercising, but a few hours later when I bent down to pick up the baby from the crib I threw my back out. I was literally laying on the floor with the baby on my chest unable to move. My mother had to come rescue me. Not fun.

3. Check in with your doctor. I always wait for my six week check up to get the okay from doctor before I start running. (I do walk before) But, if you are super motivated, you may want to call or email your doctor just to get their advice before starting. They are trained professionals after all.

I hope that helps you get started. More next week! Wish me luck as I start to get back on the running train trail.

Chocolate Almond Popcorn


Happy Friday! Here is another delicious simple popcorn recipe. I have to say, I'm not sure why I have  published so many food related posts lately. I really don't like to cook...most of the time. It must have something to do with fall and the cold temperatures that have finally made their way to the northeast. I am pretty sure that this will be the most food posts you will see from me.

Anyway, all you need for this easy "recipe" (I'm not sure it is even a recipe) is two extra large Hershey bars (with almonds or not) and popcorn.

Step 1: Pop the popcorn
Step 2: Spread the popcorn in a single layer (I used wax paper just like with the caramel popcorn recipe)
Step 3: Break the chocolate bars up in a bowl and put the bowl in the microwave for a few minutes. Take it out every 30 seconds or so and stir it.
Step 4: When the chocolate is fully melted drizzle it over the popcorn.
Step 5: Let it cool

See? Easy!


For a variation on this, put the caramel and the almond chocolate together!


Thursday, October 24, 2013

What to do with a Plethora of Apples: Post Two

A few days ago I told you all about our apple picking trip and the fact that my family and I are now drowning in apples. Here are a few other recipes that I have tried to use up our apples.

Apple chips:
Slice as many apples as you would like very thinly
Lay them out in a single layer on a cookie sheet
Sprinkle them with apple pie spice
Put them in a 200 degree oven for 1 1/2 to 2 hours turning them once after about an hour

**My 6 year old devoured these. They are crispy and pretty yummy. Although, I have a feeling that the fact that they are "chips" has a little to do with it.


Apple Pancakes:
Dice up one or two apples depending on how many pancakes you are making. I used one apple for 6 pancakes.
Put the apples in a bowl with a splash of water and a teaspoon of cinnamon
Microwave the apples for 2 minutes to get them soft
Prepare your favorite pancake mix (that's right, no pancakes made from scratch for me)
Dump the apple mixture into your pancake mix
Make your pancakes as you normally would, or if you have never made them, follow the directions on the box.
**Once again, my kids loved these!

Apple Muffins and Bread
I found this recipe here on food.com. According to the website it is the bread recipe from the Puffin Inn in Ogunquit, Maine (Love Maine!).

I only have one bread loaf pan so I made one loaf of bread and used the rest of the mix to make muffins. Once again, the boys gobbled them up! Maybe they just eat everything??

Sorry for the lack of pictures. The kids literally ate the food before I remembered to take any. I promise to do better next time!

No Sew Bean Bags - Let's get crafty!

Recently, on Zulily, I saw a set of beanbags that looked pretty fun. (I admit it, I'm a sucker for bean bag.) These bean bags came in all of the primary colors, which would be great for my 2 year old who frequently tells me that everything is either yellow or green. I also recalled my oldest (eldest??) son's kindergarten screening where they had him catch bean bags. (Let's just say I wish that I had practiced that particular skill more with him before the screening.)  I quickly put the bean bag set in my shopping cart and was just about to hit the checkout button when I realized that I could probably whip some up pretty easily. This thought, along with my hope to have a partially homemade Christmas, motivated me to take a trip to JoAnn Fabrics. Look what I found!


I am not much of a seamstress due to the fact that my sewing machine is broken (or maybe I just don't know how to use it) so I picked up some bonding tape and some quilting quarters in a rainbow of colors. 


It took me all of five minutes (probably less) to make a super easy beanbag. If I had taken more time, I probably could have made the beanbag more square, but my boys really won't care. 

All I did was cut a square of fabric (I should be able to make four beanbags per fabric quarter), fold 
the square inside out, and iron the hem tape around two edges (one edge was made by the fold in the 


fabric). 


Then I turned the fabric right side out, put some beans in the bag, and closed up the last side with more tape. 


SO easy! Admittedly I am not much of a crafter, nor do I have any patience (I just want to get it done!) so someone with more skills could probably make these even cuter and better than me but, once again, my boys will not really care they will just love to throw these little bean bags around. (Uh oh, I didn't think about that!)

Originally I was going to embroider the color words on the front of the bag but the baby is crying. 
Maybe next time!


What cute, easy crafts are you tackling?

Tuesday, October 22, 2013

Easy caramel Popcorn

Okay guys, here is an easy fall snack that feels like a special treat.

You will need:
Microwave popcorn
Werther's baking caramels
Milk
Wax paper

Directions:
Step 1: pop a bag of microwave popcorn
Step 2: lay the popcorn in a single layer on a sheet of wax paper
Step 3: microwave the Werther's with a little bit of milk for two minutes or so. Stir the caramel every thirty to forty-five seconds
Step 4: drizzle the melted caramel over the popcorn
Step 5: eat the delicious fall snack


This treat is best eaten right away because of the caramel that is used. It is the yummy kind that stays gooey.
Yum!

Monday, October 21, 2013

Fall Outings - Apple Picking

Who goes apple picking when they already have two full bags of apples in their fridge? I do! I do! Maybe I'm crazy but for our family, apple picking is a fall tradition. Every year we travel to a local orchard that also sells donuts, cider, and other yummy food and handmade crafts. I know it sounds silly, but I really need to go to an orchard that also does the whole baked goods thing to feel like I've gotten my full annual apple picking experience.


Last year, Max wanted nothing to do with the actual act of picking the apples. In fact, when we tried to make him pick an apple he screamed. See?

I guess it just goes to show that you can't make that child do anything!

This year was a different story. He couldn't get into the trees fast enough!


When we got home I was faced with three bags of apples. Ben suggested applesauce so I got out my trusty crock pot and made the easiest version of apple sauce I have ever tried. I used the recipe from food.com ( thanks Lovebakedin) and then took some lazy shortcuts.

Instead of  measuring out apples I just cut them up until they filled the crock pot.


As you can see, I wasn't too careful with fully peeling the apples. The skin is extra fiber, right? Instead of just cinnamon I used apple pie spice, and I left out the lemon juice because we didn't have any. It turned out great. The boys are loving it with a side of pumpkin bread for their afternoon snack. Unfortunately it only used four or so apples, which means that I have a ton more apples to use up. No worries, I will come up with something! Stay tuned!


Sunday, October 20, 2013

Fall Porch

Fall is my favorite season. Maybe because of the beautiful colors, maybe because the temperatures are more mild, maybe because of the warmer, snugglier clothes and pumpkin everything, maybe because it only lasts for a brief, dazzling moment. It really doesn't matter why. I just love it!


Friday, October 18, 2013

Brotherly Love

I could not have asked for Ben to be a better big brother. From day one, when Max was born, he was a huge help. Getting diapers, wipes, pacifiers, whatever I needed. Now that he is older, he entertains Max while I feed the baby. He reads books to the baby, sings to him, and tells him,stories.


He loves his brothers SO much. Every morning he asks to hold the baby. Every afternoon, the first people  he acknowledges when he gets off the bus are the boys. Ben and Max are best friends. I have no doubt that the baby will seamlessly join the pack based on the amount of love that Ben, and Max, has for him.

Thank you Ben for being such an amazing big brother!

Thursday, October 17, 2013

Landscaping Rookie, Closing the Gap

I never thought that I would be interested in landscaping other than scanning pictures and saying "ooh that looks pretty," or having favorite flowers (hydrangea, lilac, lupine, and daisies, in case you were wondering). This all changed when they started clearing the lot next to us to make room for a new house. Remember, in my post here, one of my positives to moving to this neighborhood was the tranquil setting and the privacy. Well, with the house going in next door, and the subsequent construction over the last few months, there is neither tranquility, nor privacy. 

Just as a reminder, here are some photos of our previously mostly-private back yard:

 
 Nice, right?

To be fair, we always knew that there would be a house built in the lot next to us. However, we thought that we would have a four or so feet of wooded buffer before the cleared lot. Unfortunately, due to an oversight, our lot was not surveyed. (Advice #1 when building a new house: MAKE SURE THE LOT IS SURVEYED BEFORE BUILDING) When the lot next to us was surveyed it was discovered that our lot line was incorrect. This had a few negative effects. We had to move our septic and leech field (not "we," our builder) and get our backyard relandscaped, AND we were left with a gaping hole of nothingness between our home and the neighbors. So much for privacy! (Advice #2 when building a new house: MAKE SURE TO LOOK AT THE SUBDIVISION PLAN TO SEE EXACTLY WHERE THE HOUSES AROUND YOU WILL BE PLACED. Ask yourself; Do I have enough of a buffer between me and my neighbors? If not, pick another lot, unless you are looking for close neighbors, of course.)

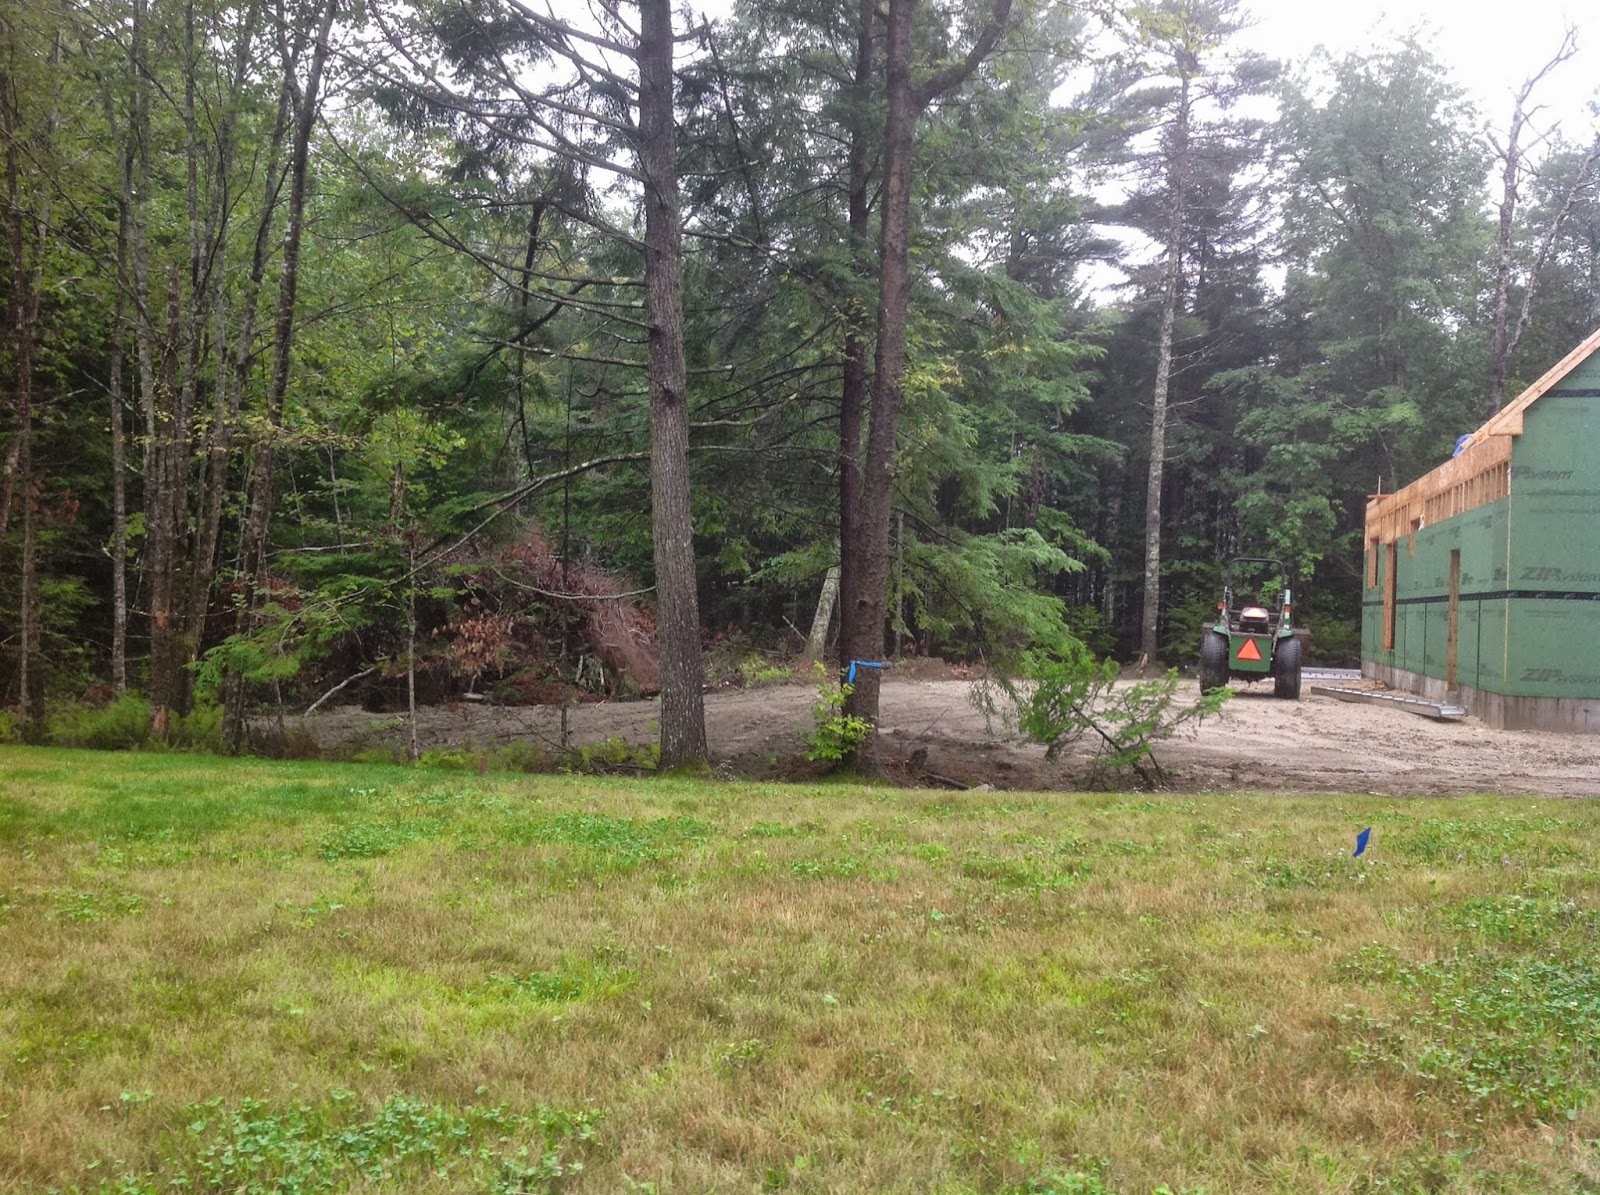
Don't believe me? Here you go:


Nice, right?

So, the Hubster and I decided that something needed to be done. If we were different sorts of people we may have made a big deal of our new lack of privacy, but instead we went into problem solving mode. At first we discussed fences, but realized that although they would be a good, quick solution, they would not provide privacy for the boys' upstairs bedroom windows. So, we quickly switched directions and started researching trees. We needed fast-growing trees, that would grow 12+ feet and that would be easy to maintain as neither of us are what you would call gardeners.

My researching spanned at least six weeks (not kidding) and I have to say that I know more about privacy screening trees for Zone 5 (that is our plant hardiness zone) than I ever wanted to know. I can now actually decipher the differences between quite a few arborvitaes and spruces. I know all about hemlocks which, by the way, was our first choice. Unfortunately the local nurseries were all out until spring and there was NO WAY I could deal with no privacy until then. 

After all of this, I actually find myself driving down the street trying to figure out what other people have in their lawns and then come home and research to see if those trees would be a better option. I even took a picture of a tree while driving (I know, not safe!) and brought it to one of my local nurseries to find out what it was. (A viburnum seiboldii if you are wondering.)

We ended up with eight trees. Yes, it was WAYYYY more money than we wanted to spend. Luckily the nursery was having a sale and gave us some awesome deals. Before this adventure I never knew that nurseries had sales of up to 70% off in the fall. Makes sense I guess, I just never really thought about it because I didn't need to know. (AHHH the good old days). In the end, we actually saved almost one and a half times what we spent. Crazy, huh?

We paid the $55 extra to get them delivered and this is how the two Techny Arborvitaes, four Dark Green American Arborvitaes, and two Norwegian Spruces were left...along with dirt and mulch.


Oh, we also had DigSafe come out and mark out our underground wires just to be safe. We didn't want to dig a huge hole by hand only to hit electrical wires. Dangerous and a waste of time. This is a free service in Maine and the surrounding states. I am not sure if they have it in other states, but it is always good to be safe and take the extra precautions.


Now, it is important to know that I had a baby about four weeks before the trees were delivered, so I was supposed to be doing things like digging giant holes. This meant that Hubs got stuck doing all the manual labor. (Poor Guy) We were supposed to get some help from our "Dirt Guy," but he must have been too busy to fit us in, sooo we were on our own.

Here are some of the lovely holes:
 And then we hit the rock pile that was left over from when they blasted for our foundation. This slowed the digging considerably, but my wonderful husband took lemons and made lemonade (as they say) and constructed a lovely rock wall as he went.
When all the holes were dug, he started putting up the trees. Here he is, hard at work. To the left is one of the Dark Green American Arborvitaes that he put in.
 Here is another view of some of the progress...

 And, of course the boys were HUGE helpers. At least, the two older ones were.


What, are you not supposed to dig holes for trees with snow shovels and lacrosse sticks?


All I can say is, I love this man. He worked for over twelve hours straight putting these stupid lovely trees in. By the end he was covered scratches from the needles on the spruces. I tried to help repeatedly, but was not allowed.


Now we have some more privacy. It isn't ideal, yet, but we hope that when the trees grow a little we will have just as much privacy as we did before they sold the lot next door. If not, well we put some equity in the house for when we sell, right?


Wednesday, October 16, 2013

For Lunch Today: Easy Autumn Salad

I am obsessed with this salad for a few reasons.
1. I can make it while holding the baby.
2. It has goat cheese in it, which is something I don't eat while I am pregnant and missed terribly. (Although you could use cheddar cheese, which would make it more fall-ish)
3. The addition oft he nuts, seeds, and dried fruit from the trail mix makes me feel like it is one of those fancy salads that you get at restaurants.

Here's what you need:
Goat cheese
Archer Farms Sunny Cranberry Trail Mix, from Target

Kraft Creamy Balsamic Anything Dressing


Baby spinach
Baby carrots
Grape tomatoes
Cucumbers

You can really use any veggies that you want. I just use the ones that are easy to grab a handful of and throw into the salad. The only one that doesn't come in convenient grab and go form is the cucumbers, but I usually peel and cut up a cucumber or two every few weeks for my son's lunches, so I can just grab a handful of those too.

If you wanted to beef it up a little and make it a dinner, add some sliced chicken. On the days when I am really hungry I may add a handful of Wheat Thins to the side.

It is a yummy and simple salad that I have been eating almost every day for the last two weeks.

P.S. Sorry for the terrible pictures. I am working on it...

Tuesday, October 15, 2013

The Dream Big List

I have started what my husband calls my "Dream Big List - home edition." Our brand new house has a five page list of "projects" and general upgrades that we were stupid enough to think would happen soon after we moved in. I am no longer that naive and realize that if I don't make a list of everything I want to do with the house, I may never get what I want. As it is, I don't see most of this happening for years, maybe even decades; especially since I keep adding to it. But, hey, dream big or go home, right? Or maybe it should be, "Dream big or move."

Anyways, here is what I've got so far - Subject to additions, subtractions, and other revisions.

First Floor
Kitchen
* Replace cabinet over stove with hood
*Add tile back splash
* move microwave into cabinet in island
* add wine fridge
* move cabinets and add open shelving around sink

Dining Area
* add built-in seating
* move light/new light
* upgrade chairs and possibly table

Living Room
*add built-ins around fireplace
* add cabinet over fireplace to hide TV and mount TV onto the wall
* create an accent wall with ship lap
* new living room furniture
* paint door

Mud Room Area
* change closet to built-in bench, cubby to help with organization
* add shelving with doors to extra area over closets
* install sliding barn door 

Bathroom
* crown molding

Stairs
* add board and batten to staircase and landing
* create photo collage in staircase

Second Floor
Hall
* Find console table
* add board and batten (?)
* add crown molding
* replace baby gate at top of stairs

Master Bedroom
* Make/Find headboard
* Add built-in cabinets around windows and possibly window seat
* Replace carpet with hardwood
* Crown molding (?)
* Fix entry to crawl space so that it can be used as storage
* Add organization to closet

Master Bathroom
* Replace tub surround with tile
* Add hooks for towels
* Personalize
* Add tile around sink area

Yellow Bedroom
*crown molding
* closet organization 

Blue Bedroom
*crown molding
* closet organization 

Nursery
* decorate for Rylan
*crown molding

Boys' Bathroom
* Add hooks for towels
* Personalize

Basement
* Finish Basement
        - Organize work room
        - storage for all of our crap cherished heirlooms
        - add guest bedroom
        - possible half bath under stairs
        - playroom/ family room

Garage
* Paint walls
* Organize
* Add locker/cubby organizer by door

Outside
Front Yard
*Front patio 
*Tree/Large shrub for privacy from driveway across the street
* Landscaping at front of house
* Window boxes
* Stain front porch
* Paint ceiling
* Paint stair treads
* Put up house numbers
* Paint door trim
* Add to supports (brick? beef up?)

Backyard
* Add privacy trees (partially complete)
* Add shed
* Fireplace
* Patio/deck
* Build bridge to paths into woods
* Landscaping

Long-term (i.e. Big, Big, Big, dreams)
* Addition off of dining area to be office/playroom
          - create patio off of new addition
          - add built in grill attached to propane
          - add pergola
* Rework 2nd floor hallway to create access to a finished third floor to add two rooms and possibly 1/2 bath

So, that is it. From time to time I may go back to edit, add to, delete this list as my dreams change. I may even post about inspirations for some of the items on this list. If you can't wait for that, check out my Pinterest board, "For Home" most of my inspiration ends up in there!

Just looking at this list makes me feel completely overwhelmed... wouldn't it be nice to be rich and just be able to do it all at once? There I go dreaming again!

Prepping for Baby: Feeding the Family

It is no secret that when you return home from the hospital with a newborn baby you are less than energetic. In fact, if you are like me, you may find your sweet spot on the couch, nestle you tender body into it, and do everything that you can not to move for two to three weeks.

With my first son this was pretty easy. My husband was lovingly caring for me, waiting on me hand and foot, cleaning, preparing meals, basically being my house b (as he called it). Additionally ever extended family member and friend I had ever know was chomping at the bit to snuggle with my perfect, beautiful baby, and would do any chore I asked for the chance. Even when my HB had to return to work, I was able to milk the princess status for another week or two.

When my second son entered the world, things got a little more complicated. Yes, my husband picked up his role of HB again, but his attention was split between the baby and I, playing with my 4 year old when he was home, and constructing a play set that the four year old had received for his birthday when the little angel was at daycare. (Who knew it took so long to set those things up?) And, yes, we still had the slew of visitors to cuddle with this new little prince, but they were more likely to spend time playing with the 4 year old than doing chores for me. This resulted in the unfortunate predicament that when dinner time rolled around there was rarely any dinner prepared, or easy to make, for my starving 4 year old angel, my darling husband, or for my battered self. Luckily my mother rallied the troops and prepared food started showing up on my doorstep from friends and complete strangers (lovely co-workers of my parents) alike. Additionally, my husband happily ordered take-out at least four nights a week. Not the healthiest option.

I vowed that this would not happen again when my third son made his beautiful self known. I was about to be the mother of three, three boys no less, I had better get my shit together. So, I began planning and searching Pinterest for every make-ahead meal I could find. This pre-planning made the difference between letting my family starve (not really) and keeping them healthily, happily fed. This
one step helped ease my transition back home and took a little bit of worry off of my plate. No matter what, the family would be fed!

If you would like to prepare some meals in advance here are some pieces of advice and recipe resources that may help. Personally, I cook more as a necessity than for pleasure, so I tend to go for easier recipes that require fewer pots (less dishes!). Just wanted to let you know so that you don't expect gourmet recipes.

Tips:

1. I recommend starting four or five weeks before your due date. This way you can make double batches of meals you are already cooking over the span of days and weeks instead of getting stuck in a weekend cooking marathon. Unless you like that sort of thing. If so, then more power to you.

2. Purchase disposable aluminum pans and tin foil. This way, when you are done, you can throw away the pan which means less dishes. Yay!

3. Search for recipes your family will like to eat. Here are some sites that I found:
Southern Girl Cooking
Cooking Light: Best Freezable Meals
Fitness Magazine: Make ahead meals

4. Don't be afraid to use tried and true recipes that you know your family already loves. I made shepherd's pie, baked ziti,  stuffed green peppers, and chicken enchiladas.

5. If you have in season veggies make good use of them. When I was prepping my meals corn was in season. I simply bought extra, blanched it (boiled it for a few minutes, then immediately put it unto an ice cold bath) and froze it for an easy, healthy side. Bonus: when we actually ate the corn it was no longer in season so it was n added treat for my two boys who LOVE corn on the cob, but get sick of it when we eat it almost every night in the summer. (Imagine that)

6. Get your kids into the action. They LOVE helping out in the kitchen!


Oh, and once the baby comes and you are just at the edge of being able to function again, but still tired most of the day, the crock pot WILL become your best friend. That way you can make dinner when you have the energy and time (i.e. when the older kids are at school/daycare.)

This was honestly one of the best things that I did to prepare for the baby. It has made the transition SO much easier. I hope it helps you too!

If you have any other great, easy, recipe sources please feel free to share. I am still using my crock pot AT LEAST four days a week. In fact, I have applesauce cooking right now!