Showing posts with label decorating. Show all posts

Wednesday, February 5, 2014

Wall Art - Scenic Photo Edition

If you haven't realized it yet, I LOVE that I live in Maine. We have the sea, lake, mountains, heck we even have a desert in Freeport. This place is beautiful!

My decor style, if I even have one, tends toward the Maine feeling: Laid back, comfortable, cottages. The art on my walls also embraces the beauty of Maine and all things associated with it. I have quite the collection of photographs from Southern Maine photographer, Rick Abbondanza, on my walls.

Rick's photographs embrace the sensibilities of Maine. They highlight the beauty of the state from the seas to the mountains. I have been collecting them for years, and have been able to put together some nice groupings in my home.
 
Here are some of my favorites:
*Marshall Point Light, Port Clyde
* Dory 1
* Royall River Dinghies
* Islesford Dinghies
* Exchange Street
* Sugarloaf: Fall Dusting

These are just a few of the many photographs available. If you get a chance, check out the site and let me know what your favorites are!

Monday, January 6, 2014

Wine Cork Hooks

If you read this blog regularly, you know that I have been working on updating the closet in the back hall to make it more of a mud room. If you don't read the blog, but want to know more about the project, check out the posts here, here, and here.

I have spent a few hours browsing for bins and hooks for storage in the cabinets. I think I have found most of what I am looking for, but until I pull the trigger and input my credit card information, I decided to try a project with wine corks.

The inspiration came from reading this post on A Beautiful Mess. It got me thinking about all the wine corks that I had hidden in drawer in the kitchen. I'm not sure why I save them, I just do. Then, my mind wandered to the browsing that I had just been doing for the closet. And then Pinterest popped into my head (because it tends to go there, always) and I remembered all of the clever things that people had done with wine corks. Why not try it myself?

I have to admit that I thought this one would fail epically. And, it was completely trial and error. But, it worked. Here is what I came up with:


You may be thinking that these look like corks, sitting on a surface, but they are not. They are hooks... in the closet. I know, crazy, right?

First I scavenged for corks and found these three. They are all rubber corks. I am not sure what would happen with real cork ones. I have a feeling they might split when you drill the hole into them, but maybe not. 


Although I was originally going to have them sticking straight out, I realized that each of them could have a completely different orientation on the wall. So, crazy me, I tried all three ways.

First I had to figure out where to put them on the wall. I had a command hook lower in the closet so my 2 1/2 year old could hang up his own jacket. I pulled off the hook (and paint and wall with it. Oops!) and used that area to hang my first hook.

I drilled the cork with a 1/4" drill bit. I wanted the hole to be big enough to get the screw in, but small enough so it wouldn't move around too much. I tried a variety of sizes and this is the one that worked the best.  I also mistakingly drilled through the entire cork, oops! If I did this again, I would have only gone halfway through. Luckily the ones that went all the way through were when I was trying out smaller drill sizes so the holes aren't as gaping as they could have been.
 
I made the holes depending on how I wanted the corks to hang on the wall.

I used drywall anchors to secure them to the wall. At first I was going to put the screw into the cork and then screw it into the wall. It didn't work. So, instead, I put the screw into the wall leaving about a quarter inch hanging out of the wall.


Then, I put the cork onto the screw,
and hung something on it to make sure that it was secure and wouldn't twist on the screw. 
It worked! Although if you want it to be more secure on the screw you could add a dab of glue into the hole before you put the cork on the screw.  The reason that I didn't is because I am afraid of what might happen if I ever want to take the corks off the wall. Theoretically you should be able to just unscrew the cork, but one never knows...

Here is the third one, which is actually more of my original idea:

 I kind of like them. And they were cheap free, so why not? If I get sick of them I can always take them down. And now I have hooks to hang some more of our winter gear. Good thing because it is snowing...again!

What do you think? This took all of 20 minutes. So it was quick, and easy!


Wednesday, December 18, 2013

Quick and Easy "Joy" Decoration

Here is my quick and easy home decor for the holidays. Seriously quick (less than 15 minutes) and seriously easy ( if I can do it anyone can).

The supplies:


Yes, the glass of wine is imperative when I am trying to throw something together at 10:00 at night...

If you notice, the glass balls I bought have different finishes. The matte balls were the easiest to work with. They clung to the glue much better. I would also recommend using the stronger hold glue sticks ( I used the lightest hold and I really had to slather it on).


I laid out the balls to form the letters making sure the hooks for the string were in the back except for the top, which I turned up so I could add ribbon to hang the letters. Then I just applied the glue where the balls met. 

When it was dry, I strung the ribbon through the loops at the top of the balls and hung them up. Make sure to string them through more than one bulb to help distribute the weight.


Easy peasy!


Wednesday, November 6, 2013

It All Started with a Chair

Is it strange that I have a sudden urge to build a room around a chair?  I think it might be, and yet it seems like a good starting place for decor... it's probably something that you learn in design school.


I spotted the Bella Side Chair on Joss and Main and IMMEDIATELY became obsessed with it. I am not sure why but my mind started scrolling through multiple places where it could go in my house. It would look awesome at the head of my dining table. And, since it comes in a set of two, it is totally affordable. But the white in it doesn't seem like a smart move with three small boys. Plus, a dining table usually has food around it, which would also not be good mix with the fabric.

So, the table is not really where I would like to put the chair...the polka dots are also too similar to my living room wall color. Nope, I have the perfect spot. A little corner in my upstairs hallway that I have been dying to use as a reading nook.

Originally I was going to put built-ins in the wall to the right between the studs for books, but there are electrical wires along the inside of most of the wall and I really don't feel like becoming an electrician and moving wires. Now I am thinking that I will need to do something this, this, or this. I may even be able to DIY something with a little help from Ana White.

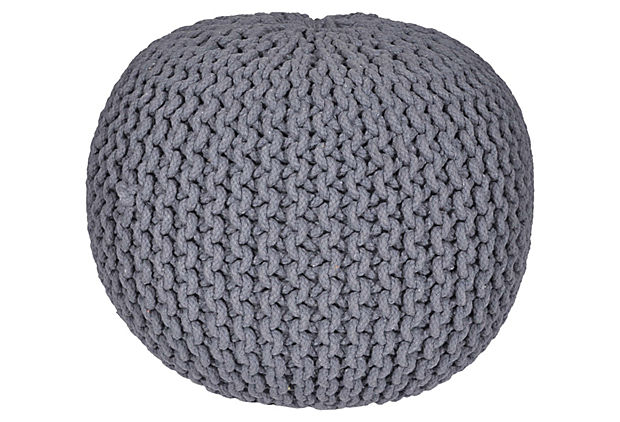
I was also thinking that a little pouf would be perfect for this space. When it is not in use, it could slide underneath the chair. If someone wanted to do a little reading all they would need to do is slide it out and use it as a footrest, or a place to put a drink, it could really be for anything. Although in my home it would more likely be used as a boat or space ship by the boys.

Maybe something like this one from One King's Lane 
https://okl.scene7.com/is/image/OKL/Product_KML17206_Image_1?$product$


or  this from West Elm
Zigzag Dhurrie Mini Pouf


I wish I could show you the finished product with all of it put together., but I am not talented enough to do a mock-up in Photoshop. For now, it will have to stay in my brain. The perfect reading nook. Maybe some day. A girl can dream. *SIGH*

What has caught your eye lately? Any chair dreaming going on?